These Mango Popsicles are easy to make with just a few ingredients. Try the Zesty Mango, Creamy Tropical Mango or Ginger Mango Spice for a delicious summer treat!

Who doesn't love a frozen dessert!? Ice cream and popsicles are a summer must and these homemade popsicles are made with fresh fruit and simple ingredients.
Have you ever made popsicles from scratch? They're pretty straight forward with a store bought mold, but what if you don't have one?
Well, I got some options for you!
How to Make Popsicles Without a Mold
Don't have a mold? No problem! Here are some alternatives:
- Plastic cup or muffin tin and saran wrap: Pour the mixture into the plasic cup or muffin tin, cover with saran wrap and cut holes in the saran wrap to stick a popsicle stick in the center. The saran wrap will suport the popsicle stick to stay in the middle while it freezes.
- Use a metal loaf pan: Similiar idea as the first method but a little different. You'll want to make enough popsicle filling that it fillings the loaf pan a few inches high. Cover with saran wrap and cut holes to insert the popsicle sticks. Freeze and slice between each popsicle stick to get an individual slice/popsicle!
- Make mini popsicles! Use a dixi cup or ice cube tray for tiny popsicles.

How to Make Popsicles Creamy and Smooth
How do you make popsicles not icy? You want to add sugar and/or fat. Sugar lowers the freezing point of water and helps prevent the popsicles from freezing into an ice block.
In the 3 flavors, simple syrup adds the sugar along with the ripe mango!
Fat adds creaminess and smooth texture. In the tropical mango popsicles coconut milk adds that creaminess.
The Key to the Recipe
The main thing with the recipe is making sure the mangos are ripe enough!
Since sugar is so key to getting that smooth texture, we need the mangos to be as ripe as possible. Otherwise, you might need to add more simple syrup.
Below, you can see how ripe the mangos are when they're used for popsicles - they're more of a bright orange than yellow.

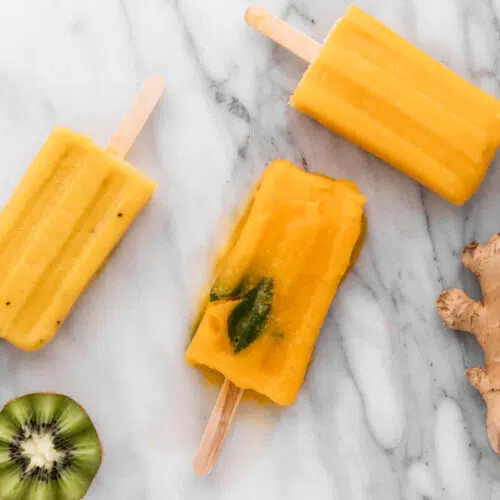
The Three Flavors
Creamy Tropical Mango: fresh mango, kiwi, coconut milk and shredded coconut along with lime juice and simple syrup make up this tropical popsicle!
Zesty Mango: ripe mango, lime juice and zest plus mint leaves and optional mint simple syrup is divine!
Ginger Mango Spice: Fresh ginger root and mango blended with lime juice and simple syrup is refreshing and the perfect mix of sweet and spicy!
Recipe Tips and FAQs
You can! Just make sure to completely defrost the fruit before measuring it and using it in the recipe.
You may need to run them under water for 20-30 seconds or gently twist the mold to release the popsicle.
Mango Popsicles: 3 Flavors!
Ingredients
Zesty Mango
- 4 cups chopped mango about 4 mangos
- 2.5 tablespoons lime juice
- 4 teaspoons mint simple syrup or plain simple syrup
- zest of one lime
- mint leaves optional
Creamy Tropical Mango
- 4 cups chopped mango about 4 mangos
- 2 chopped kiwis
- ½ cup full fat coconut milk
- 4 teaspoons lime juice
- 2 teaspoons simple syrup
- shredded coconut optional
Ginger Mango Spice
- 4 cups chopped mango about 4 mangos
- 4 teaspoons lime juice
- 4 teaspoons simple syrup
- 2 teaspoons chopped ginger root
Instructions
Zesty Mango
- Blend the mango, lime juice, mint simple syrup (instructions below in the notes) and lime zest together until smooth.
- Pour into popsicle molds and tuck mint leaves if desired into popsicles.
- Freeze for 4-6 hours.
Creamy Tropical Mango
- Blend the mango, kiwi, coconut milk, lime juice and simple syrup together until smooth.
- Pour into popsicle molds and freeze for 4-6 hours.
- Sprinkle or pat shredded coconut onto the popsicle if desired.
Ginger Mango Spice
- Blend the mango, lime juice, simple syrup and ginger together until smooth.
- Pour into popsicle molds and feeze for 4-6 hours.
Notes
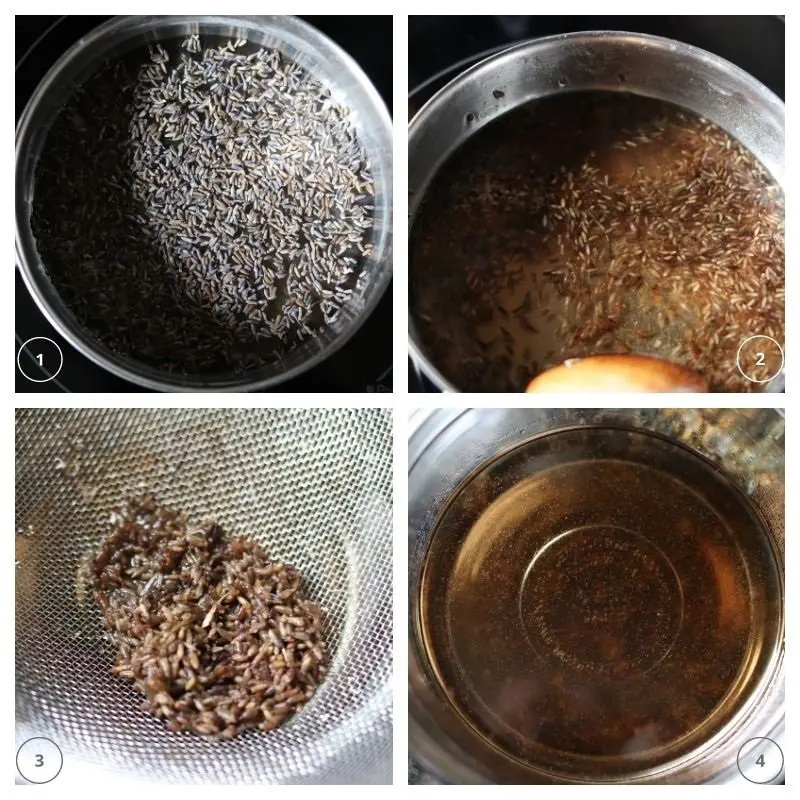
- To make homemade mint simple syrup: bring ¼ cup water and ¼ cup sugar to a simmer in a saucepan over medium heat. Once all the sugar dissolves, take the pan off the burner and add ¼ cup mint leaves (about 10-15 leaves). Allow the leaves to infuse into the syrup for at least 15 minutes before pouring into a bottle to store for later. You can use the mint syrup in other drinks like ice tea, lemonade or mint juleps!
- To get the popsicle out of the mold, you may need to run it under warm water for 20-30 seconds or twist the mold to release it.
- You can use frozen mango, but make sure it completely defrosts before measuring it. I've also noticed frozen mango doesn't seem to be as ripe as I'd like, so fresh may be best with this recipe.


